Effective and brand-oriented invoices are crucial for running a successful business. With the rise of virtual stores, the demand for these invoicing solutions is also increased as businesses need online transactions to maintain transparency.
Fortunately, WordPress has plenty of options to ensure smooth and flexible WordPress invoice management systems. Wondering how?
No worries.
In this blog, we will discuss everything about these invoice management systems along with a suitable plugin. But, before that let’s learn about the basics of invoicing.
Table of Contents
What is an Invoice in WordPress?
An invoice refers to a detailed summary of purchased items including item costs, quantities, taxes, terms & conditions, etc. These invoices can be automatically generated, customized, and sent to your customers by employing a WordPress billing or invoicing plugin.
What is a WordPress Invoice Management System?
WordPress invoice management system is a software or plugin specially designed to assist businesses to create, customize, and manage their invoices in the WordPress ecosystem. Simply, it means handling all the tasks that are needed to maintain a flawless invoicing system.
Why Use WordPress Invoicing Plugin Despite Using WooCommerce?
WooCommerce provides only basic invoicing capabilities whereas the WordPress invoicing plugin offers all the advanced features that are worthwhile for invoice generation. Here are more benefits of leveraging this invoicing solution:
- Extended customization: A dedicated invoicing plugin offers more customization options than a general or freemium solution. This plugin allows you to tailor your business by offering opportunities for proper branding.
- Additional invoicing features: These invoicing solutions come with specific features such as multiple payment gateways, tax settings, recurring invoices, and more to bring flexibility to your invoice management system.
- Automation: Some plugins also offer additional features for workflow automation such as sending auto-reminders for overdue invoices, thank you messages after payment completion, etc.
- Effective branding opportunities: Dedicated WordPress billing system has options to promote the brand on invoices. Therefore, you will be able to successfully create brand awareness among your audience.
- Friendly customer relationship: By utilizing these WordPress invoicing plugins, you can seamlessly build smooth relationships among your customers while interacting for invoices.
How to Create Invoices in WordPress
An invoice offers a clear record of the products or services provided by the seller. This is not only crucial for maintaining business transparency but also good for establishing agreements between two parties. Now, thankfully, you can generate these invoices in a flash leveraging the best WordPress billing plugin. But, which one?

Propovoice is one of the growing WordPress invoice solutions that make invoice creation flawless and effortless. This full-fledged invoicing plugin also includes lead management, client management, project management, etc so that you can enjoy everything in one package.
Now, eager to unveil the easiest invoicing process?
Check out the following step-by-step process of the WordPress invoice management system:
Step 1: Install an Invoice plugin.
First thing first, you have to install Propovoice from the WordPress plugin repository. For installing Propovoice, go to Plugins >> Add New and search for Propovoice. After installation, activate the plugin to create invoices for your business.
Step 2: Create Invoices Using Propovoice.
After installing Propovoice, the best invoice generator for WordPress, go to your WordPress dashboard and click Invoice under the Propovoice tab. Now, click either “+Add Invoice” or “+Let’s Start Creating”.
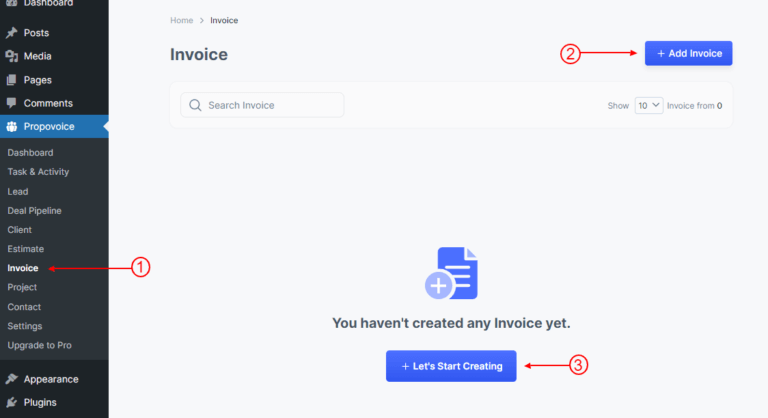
This will take you to the “Select Template” tab from where you can choose any template you prefer by hitting the “Select” button. Besides, you can also check how your template looks by clicking the “Full Preview” button. Now, after nominating a template, hit the “Continue” button.
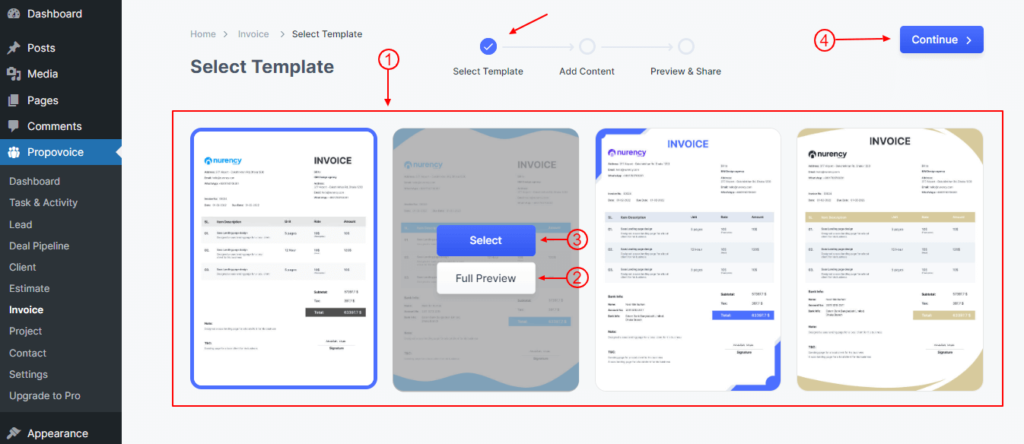
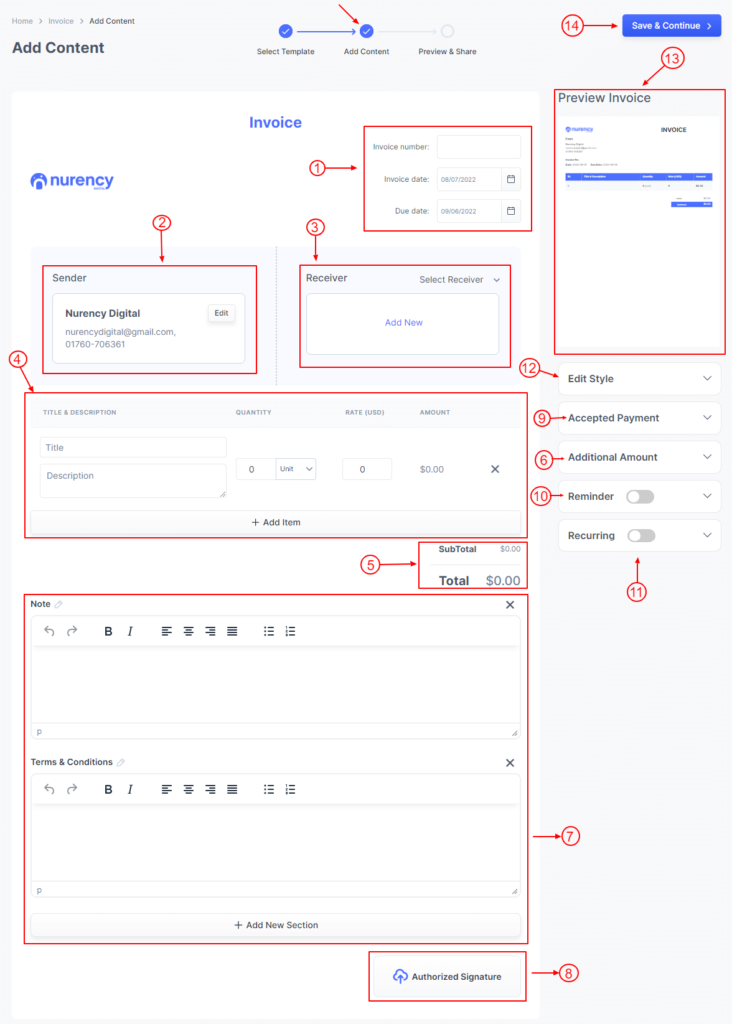
This will take you to the “Add Content” section where you need to adjust the following information:
- Enter the Invoice Number, Invoice Date, and Due Date.
- Select the Sender or the Business Name for your invoice.
- Choose whom you want to send your invoice to or simply Receiver.
- Add necessary data for the invoice such as Title, Description, Quantity, Rate, and Amount.
- Now you can see your client’s Subtotal amount.
- You can also add additional amounts such as tax, shipping, and other costs to the total amount.
- Now add Note, Terms & Conditions if required.
- Insert the Signature image of an Authorized person.
- Add necessary gateway systems from the “Accepted Payments” section.
- Set a reminder from here.
- Also, enable the Recurring button of the invoice if you want your invoices to be regenerated.
- Edit invoice style from here such as color, font, etc.
- With each edit, you will get to see how it looks from the Preview Invoice section.
- After editing all the content, click the “Save & Continue” button.
After hitting the “Save & Continue” button, it will take you to the “Preview & Share” tab. You can Edit, Download, Print, and Share Invoices from here. Then, click the “Send Email” button.
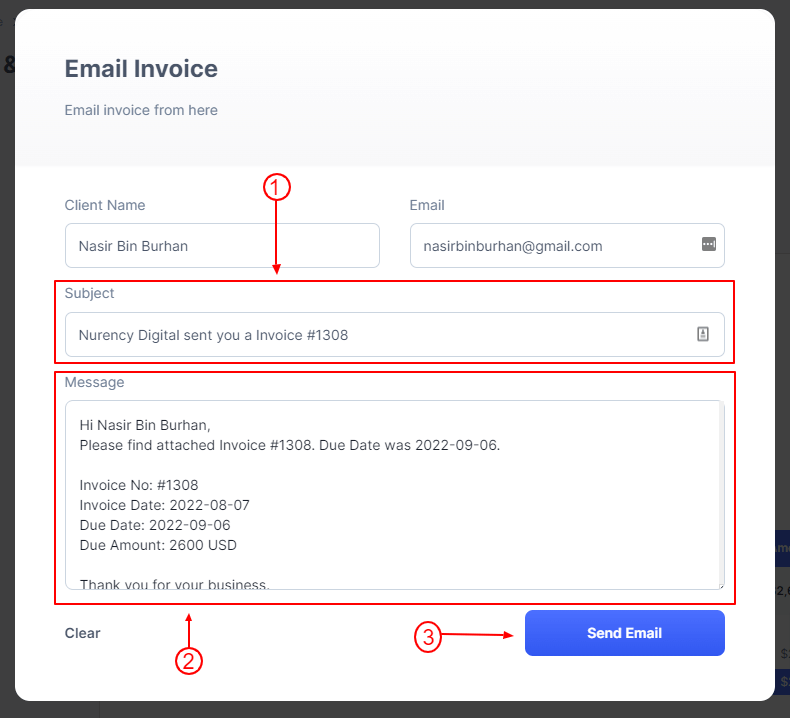
Now, a mail-sending form will appear from where you can change your Email Subject and Message. After that, press the “Send Email” button.
Step 3: Configure Invoice Settings.
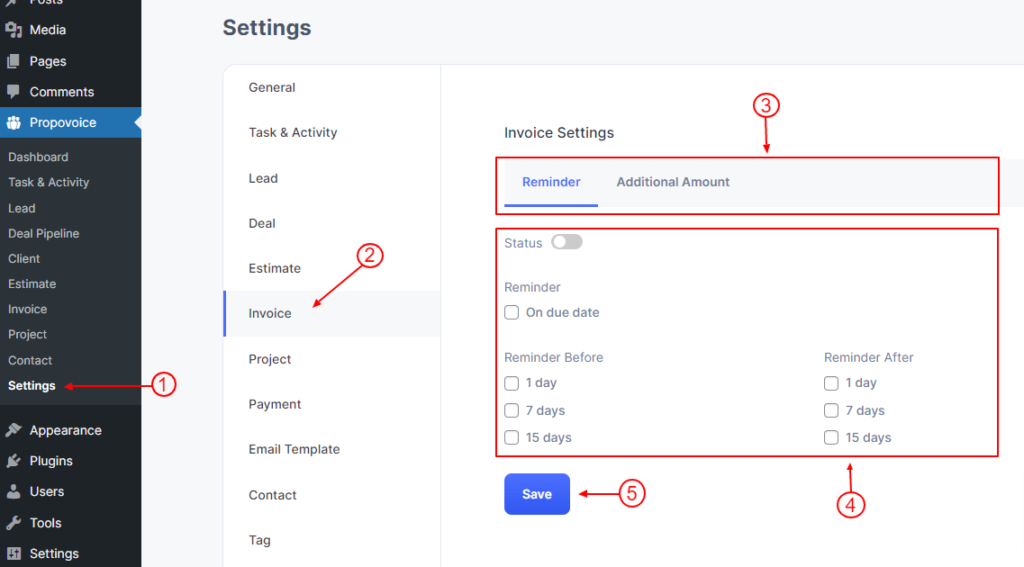
In the third step, you need to visit Propovoice >> Setting tab. Now, press the Invoice tab from the Settings page. Here you will get an option to make all the necessary reminder settings. At the end, hit the Save button.
Step 4: Set Up a Recurring Subscription.
After wrapping up all the configuration, you will find an additional option called “Recurring Subscription” if you are a premium user. This option will allow you to add recurring invoices with invoicing plugin.
Now to enable automated or recurring subscriptions, go to Invoices from the dashboard that you will find under Propovoice. Here from the list of invoices, select one for which you want to enable the recurring subscription.
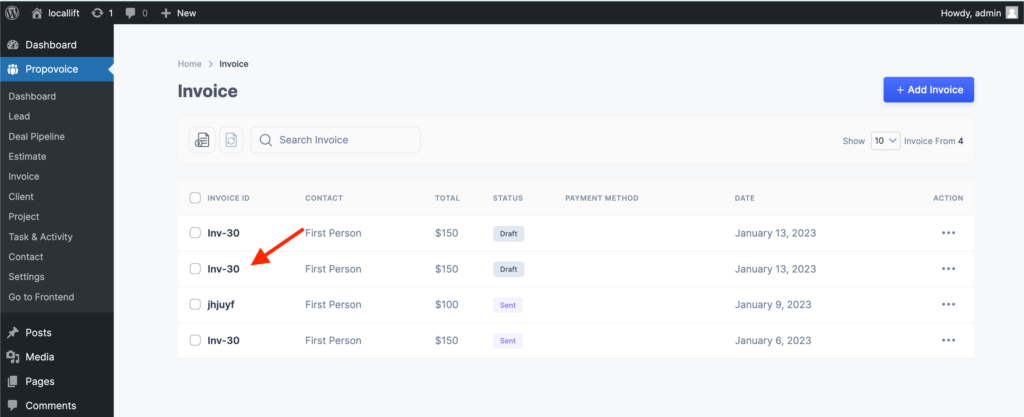
Now, enable the “Recurring” toggle to find additional settings such as subscription frequencies, interval, number, limit, auto subscription, delivery option, etc.
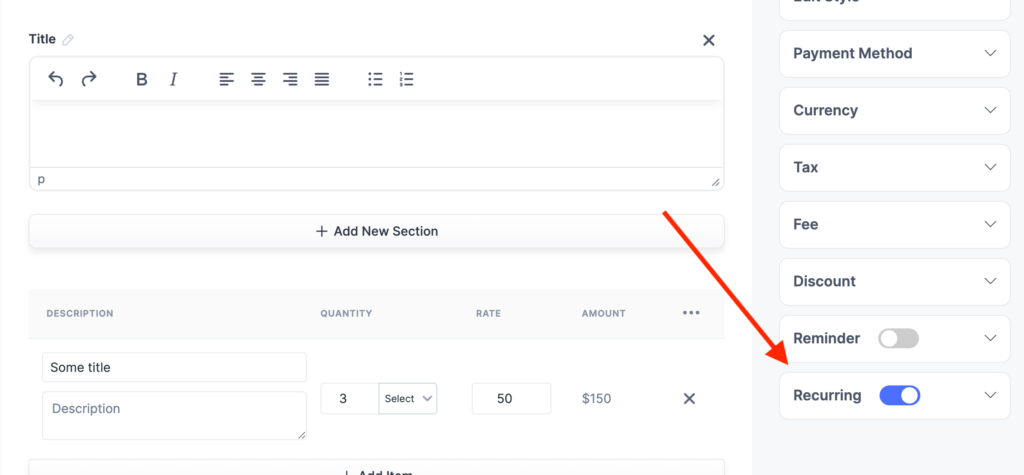
After adjusting all these options, a recurring subscription for your invoice will be set.

Can WooCommerce Generate Invoices?
Yes, WooCommerce can create invoices for your virtual store. But, you can’t enjoy this feature by default without using any additional plugin or extension. By utilizing WooCommerce PDF invoices, you can enjoy the automatic invoice creation feature. This is a freemium plugin that you will find in the WordPress plugin repository and enjoy wonderful invoice creation.
Wrapping Up
Navigating invoicing has never been easier, thanks to dedicated invoicing plugins like Propovoice. By now, you have already learned how the WordPress invoice management system works or how it revolutionizes the complete digital invoicing process.
Now what? It’s time to take steps towards a better invoicing future that you can achieve only by utilizing WordPress billing or invoicing systems. So make up your mind and get started with the digital solution for your invoice management.

